Allegro Computing Environment
Allegro Computers
Desktop Machines
At Allegro, we have five computers that are dedictated to high-performance work with ALMA data:
| name | processor | speed | memory | alias |
|---|---|---|---|---|
| tulor | 40x Intel Xeon E5-2640 v4 | 2.40GHz | 515.7 GiB | TU |
| helada | 32x Intel Xeon E5-2640 v3 | 2.60GHz | 516.8 GiB | HE |
| chaxa | 32x Intel Xeon E5 2665 | 2.40GHz | 258.3 GiB | CX |
| cejar | 16x Intel Xeon E5 2650 | 2.00GHz | 32.1 GiB | CE |
| tebinquiche | 12x Intel Xeon E5645 | 2.40GHz | 47.3 GiB | TQ |
All these machines except tebinquiche are running Red Hat Enterprise Linux Server release 7.5 (Maipo). tebinquiche still runs 6.10 (Santiago) and is intended for legacy purposes.
Logging in to any of these machines works through e.g.
$ ssh -X username@chaxa
From outside the STRW network, you cannot reach these machines directly: you first need to ssh to a normal Sterrwacht machine, and from there to one of the Allegro ones.
Filesystem
Our data is stored on several filesystems - three at last count. Two of these (/lustre1 and /lustre2) are Lustre systems, but the third (/allegro1) is mounted via the more standard NFS. Whether Lustre or NFS should be transparent to the user. Currently, these three are mounted on all 5 Allegro compute nodes under the names given above, but /lustre1 and /lustre2 at least can be accessed from all STRW computers via /net/chaxa/lustre1 or 2 (at reduced speed).
Warning
Although your files on the Sterrewacht home area are backed up on a daily basis, there is no backup scheme in place for your files on the Allegro data disks. You are therefore advised NOT to store irreplaceable files on these disk systems.
Such things as Allegro-provided software and the data archive are replicated on all file systems, but actual data is not.
Directory Structure
The root directory for all relevant files in the work with ALMA data is <FS>/allegro, where <FS> can be any of the file systems described above. The root directory contains the following directories:
allegro_staff: Only accessible for Allegro members
bin: binaries/executables
- data: ALMA data
- projects: Projects
- public_data_archive: Public data that is accessible for everyone
doc: Documentation (e.g., ALMA handbooks, ...)
etc: Startup scripts, etc.
home: Each Allegro user will have a subdirectory under this with their username, but please note: don’t be deceived by the name, this is NOT the same as the normal Sterrewacht home area. In fact we mainly use this directory as a place to put links to your data.
lib: libraries (e.g., python modules, ...)
Working on Allegro Computers
Environment Setup
Before using the Allegro computers, it is advised to set up your system to get full access to the system-wide installation of python modules, binaries, etc.
Setup scripts
We have generated a script that sets up all the environment variables (most importantly the environment variable ALLEGRO) to use the software, find programs, etc, to facilitate the work with the Allegro computers. It also displays any important information about changes in the system, scheduled reboots, etc, when logging into any of the Allegro computers.
NOTE! If you don’t run these, you won’t be able to find stuff.
Rather than sourcing this script manually, it is advised to add a small statement to your shell rc-file. The following lines will check for the computer you are currently logged in, and source the startup scripts if needed:
Bash users should add these lines to their ~/.bashrc:
lustreroot_file='/home/alma/etc/lustre_root'
if [[ -r $lustreroot_file ]]; then
  lustreroot=`cat $lustreroot_file`
else
  lustreroot='/lustre1'
fi
alg_user_setup=$lustreroot/allegro/bin/bashrc_user.sh
if [[ -r $alg_user_setup ]]; then
    . $alg_user_setup
fi
C-Shell (i.e. tcsh) users should add these lines to their ~/.cshrc:
set lustre_root_file="/home/alma/etc/lustre_root"
if ( -r $lustre_root_file ) then
  set lustreroot=`cat $lustre_root_file`
else
  set lustreroot="/lustre1"
endif
set alg_user_setup=$lustreroot/allegro/bin/cshrc_user.csh
if ( -r $alg_user_setup ) then
    source $alg_user_setup
endif
Note
If in doubt what type of shell you are using, type
$ echo $SHELL
Note
It should be noted that by sourcing these scripts, your default for the umask will be umask 002. This means that by default, the group gets the same permissions as you, and others will not have write permission.
Warning
If you do not source the rc-files, you might miss important information about changes in the system or scheduled reboots, which are otherwise displayed in the console every time you log in. If you do not wish to source the rc-files, but you still would like to display the system messages, please run display_messages.sh. If you choose not to display the system messages, we do not take any responsibility for eventual data loss due to reboot.
CASA setup
To access the user-provided CASA tasks and other modules when you work on the Allegro computers, simply add the following lines to your ~/.casa/init.py:
import socket
hostName = socket.gethostname().split('.')[0] # this seems to be the most robust/portable way to obtain the hostname.
available_hosts = open('/home/alma/etc/available_hosts').read().split('\n')[:-1]
if hostName in available_hosts:
    allegro = os.getenv('ALLEGRO')
    exec(open('%s/etc/casa/init.py' % allegro).read())
Note
This will only work if (as described in section Setup scripts) you have sourced the rc file that sets the environment variable ALLEGRO, which points to the Allegro root directory.
Running CASA
The Sterrewacht IT department provides a version of CASA on all machines, and this is what you will see if you type casapy on Allegro machines too, if you have not set up your environment the way we recommend above. There is nothing wrong with doing that if you wish to, but Allegro does not specifically support that installation of casa. We provide and recommend our own versions, which is what casapy will source if you have followed the instructions re setup above.
Allegro maintains several versions of CASA compiled for both Red Hat 6 (only on tebinquiche) and Red Hat 7 (all our other machines). You can find which versions are present, and the shorthand commands to invoke them, by typing on any Allegro machine:
ls -l $ALLEGRO_LOCAL_BIN
For example, to run CASA-5.4.0 in the Allegro environment, type:
casapy-54
at the command line (on all machines but tebinquiche, which doesn’t have it). Typing simply:
casapy
will start up the Allegro default version. NOTE however that this is not necessarily the latest version of CASA.
ALMA Projects
The idea of a project is to have a workspace for one or more users where they can collect all necessary information to work on one or more ALMA datasets.
Categories
There are two kinds of projects for users:
- PI Project: In this kind of project, Allegro supports the PI from the creation of the scheduling blocks up to the point where the data is delivered. The project ID must be the ALMA ID.
- Open Project: This category is dedicated to non-PI users that visit Allegro to work on ALMA data. That can be either archival data, or also propietary data that the user brings along. The project ID can be chosen arbitrarily.
ID
Each project has a unique ID, the so-called project ID. This is a combination of the project category and the ALMA ID, which are combined projectID = category + '_' + almaID. Categories are pi and open for the two types of categories.
Project Access
The root directory for projects is $ALLEGRO/data/projects. Its content cannot be read by the user, which is part of the security-by-obscurity data protection scheme. The root directory contains one subdirectory for each project. The project directory name is a 8-digit alphanumeric random string, ensuring that no other user can see what other projects are currently active at Allegro.
A project is only accessible for users that are linked to the project. Linking a user to a project means that we guide the user through the obscurity layer. This is achieved by setting a symbolic link to the project directory (with its 8-digit alphanumeric code) in an area that can only be accessed by the user.
For this we use a directory under $ALLEGRO/home. If we grant a user (e.g., with the guest user name allegro5) access to a project, a directory will be created with special Access Control List (ACL) permission.
$ ls -lah $ALLEGRO/home
...
drwxrws---+ 2 alma allegro 4096 Aug 19 10:26 allegro5
...
This directory can only be accessed by allegro members and the user allegro5. In this directory, the user will find a soft link with the allegro ID that leads them directly into the desired project
$ ls -lah $ALLEGRO/home/allegro5
...
lrwxrwxrwx 1 alma allegro 38 Jul  1 13:50 pi_2013.1.12345.S -> /lustre1/allegro/data/projects/5Hnd6mtE
...
Project Directory Structure
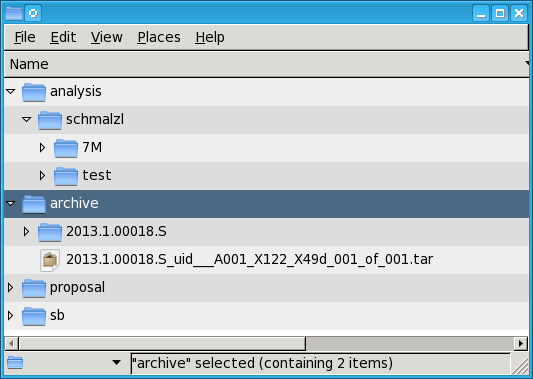
Figure 2: Example Directory Structure of a PI project.
Every project contains at least two subdirectories:
analysis: This directory contains sub-directories for every user that is part of the project. This is the dedicated workspace to perform your work. All the data (also the delivered data that is usually stored in the archive directory) should be copied into this directory.
archive: This is where the ALMA data is stored. This directory is only writeable for the user alma, but readable for all users.
Warning
Data in the archive directory should never be changed. Data from the archive should always be copied into personal directories for manipulation
Depending on the project type, more subdirectories can exist (sb and proposal for PI projects).
non-ALMA Projects
You can also use the Allegro computing facilities to perform other, non-ALMA related work. Your dedicated workspace for that is /lustre1/username (feel free to create a directory with your username). However, the general terms of using the Allegro computing facility apply.
Note
It should be noted that ALMA-related work has preference compared to non-ALMA projects.
High Performance Computing
Allegro’s computers offer great capacity for high-performance computing. As a rule of thumb, other users should be informed if more than 25% of the available cores are needed (i.e., more than 8 cores on CX, and 3 cores on TQ). Computational time can be reserved by
$> reserve_cpu_time.sh
This opens up a text file with some explanations of how to “reserve” computing time.
If some high-performance computing time is reserved in the current timeslot, this is displayed through
$> display_cpu_reservations.py

=== High-performance computing on chaxa ===
username  from        to           purpose
-------------------------------------------------------------
alma      26-08-2014  26-08-2014   modelling